- Joined
- Mar 6, 2016
- Messages
- 578
- Reaction score
- 359
Hello DJ ,
Its usual to play game from Childhood days and many are continuing it till d day.....
Many Game supports the GAME PAD controller which makes easy to Control for GAME , but some are not yet Supported by your GAMEPAD. So Here is the SOLUTION for this.

XPADDER A simple Windows application that let you make the most of your GAMEPAD rather going with KEYBOARD and MOUSE and it is free !
Here are the STEPs :
-> Download the Setup file from here.
-> Install and Run it , it shows like
 -> Now its turn to Assign the KEYS and MOUSE to your Controller.
 -> Click on the settings icon which looks like a wrench. Now, we need to select the appropriate joystick format *.bmp image file for loading onto Xpadder, we have bundled the ones for PS2, and Xbox 360 in the installer itself, however you can have a google search for *.bmp files of the gamepad controller image you have.
-> Now , clicking, on the wrench would open the image selection window – here we need to specify the image file of controller as shown by the labels 1..2.. & 3.. in the following image.

-> Now, after loading the controller image file, you will be shown the controller image in the Xpadder window.
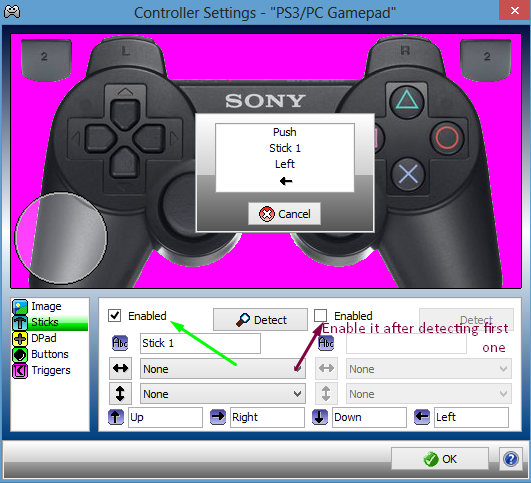
-> Here, Select the option “STICKS” present in the bottom left corner of Xpadder window, and now to configure the analog sticks – click on the first “Enable” option marked by green color in the below image labelled analog configuration , and push the corresponding analogs (whose name is indicated on the pop-up) to the directions shown in the pop-up “left,up,down,right” , do the same for the other analog too (if present) on the controller.

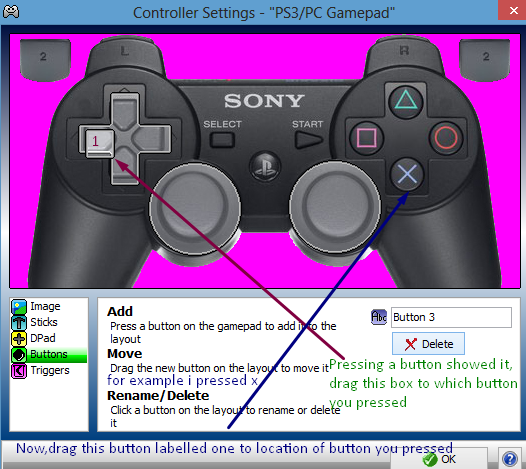
 -> Press “X” as to move the box “1” to “X” position(blue arrow). Now, please repeat these steps for all the buttons present on your Gamepad and press “OK”.
-> Now, simply run the game without closing Xpadder and play it using your Gamepad.
NOTE : Make sure your gamepad / joystick is connected to your computer before you open Xpadder. If it will shows an Unsupported Windows Version detected error on Windows 8.1 /10, then here’s the solution for the problem –
Video Tutorial :
I came to know that there was miss spelled While making this VIDEO as my Concentration is on XPADDER , Don't MIND !!
Don't forgot to hit LIKE !
Enjoy GAMERs.....
Its usual to play game from Childhood days and many are continuing it till d day.....
Many Game supports the GAME PAD controller which makes easy to Control for GAME , but some are not yet Supported by your GAMEPAD. So Here is the SOLUTION for this.

XPADDER A simple Windows application that let you make the most of your GAMEPAD rather going with KEYBOARD and MOUSE and it is free !
Here are the STEPs :
-> Download the Setup file from here.
-> Install and Run it , it shows like


-> Now , clicking, on the wrench would open the image selection window – here we need to specify the image file of controller as shown by the labels 1..2.. & 3.. in the following image.

-> Now, after loading the controller image file, you will be shown the controller image in the Xpadder window.
-> Here, Select the option “STICKS” present in the bottom left corner of Xpadder window, and now to configure the analog sticks – click on the first “Enable” option marked by green color in the below image labelled analog configuration , and push the corresponding analogs (whose name is indicated on the pop-up) to the directions shown in the pop-up “left,up,down,right” , do the same for the other analog too (if present) on the controller.

After you, push the Analog on your GAMEPAD, a transparent bubble shapes would appear on the window, drag and drop them to their corresponding controller locations , as shown in this image.
-> Once, you are done with the Analog sticks, configuration – Navigate to the “DPad” option in Xpadder, and “Enable” it, now again press the corresponding Keys (whose name is indicated on the pop-up) on the connected controller/Gamepad.
-> Now, click on the “Buttons” option in the Xpadder, and start pressing the buttons of your Gamepad – they’ll start appearing in the Gamepad image as you press them, Now place them according to the location of the button which you had pressed on the Gamepad.
-> Now, in the below mentioned example, I pressed the “X” button on our controller and it appeared on the place marked by “1” now, 'll move its appeared place shown by the maroon arrow, to its original place on the controller shown by blue arrow.

-> Now, simply run the game without closing Xpadder and play it using your Gamepad.
NOTE : Make sure your gamepad / joystick is connected to your computer before you open Xpadder. If it will shows an Unsupported Windows Version detected error on Windows 8.1 /10, then here’s the solution for the problem –
- Simply, right-mouse click on the Xpadder icon, and select the “properties” option.
- Now, go to compatibilty tab, in the section named “Compatibility mode” , select the version as “Windows 7″ and click on apply, and OK. You can also additionally checkmark the “run program as an administrator” option if you encounter any issues later.
- That’s it, Xpadder is now ready to function, in your latest version of Windows.
Video Tutorial :
Don't forgot to hit LIKE !
Enjoy GAMERs.....
Last edited:

